
Hey guys, I am Sarah. Every week I comb through hundreds of DIY videos preparing projects for our weekly Maker show, Maker Break. Along the way, I find some good projects… and some GREAT ones, And right now, I’m going to share them with you! This is Sarah’s Top 5 DIY Miter Stations
#5 is Specific Love Creations.
Clinton made this mobile folding miter station with storage perfect for anyone with a cramped workspace. Clinton got started with this build all hunched over to cut down all of his material at the miter saw that is currently located on an old table top. Once the material was cut down and sanded he drilled pocket holes into all of the boards. He lined up the frame, then screwed it together, and built a mirrored frame for the other side. Next he cut down more boards to construct the frames for the foldable wings of the miter stand and assembled them using pocket holes as well. Using plywood he built the shelves and table top. After assembling the folding wings and castors this build was complete!
#4 is Woodshop Junkies.
Jean has been on a mission to build an “All in one” woodworking workbench, and in this video he is adding the miter saw station to that build. Since he is not starting from scratch here, his first step is installing the support bars underneath the table top. Then he cuts out the space for the miter saw shelf. Builds the little shelf and makes sure it is flush with the workbench. Once that was done he moved on to the rotating mechanism that will allow you to fold down the miter saw when you don’t need it.
#3 Is WoodBrew
If you are a little shy about building your own cabinets this is the miter station for you. XXX and Molly Started off by assembling their Rockler Shop stands frames. Once the frames were built they added castors, t-track tops, and framed them out with plywood. Then they build drawers to add to the cabinets for optimal storage space. For the center console they decided to add a door, then they used their X-Carve to make maple drawer pools. Before they were finished, they added holes in the back of the middle cabinet for power cords and dust collection. All that was left was to add the miter saw, and fill the drawers!
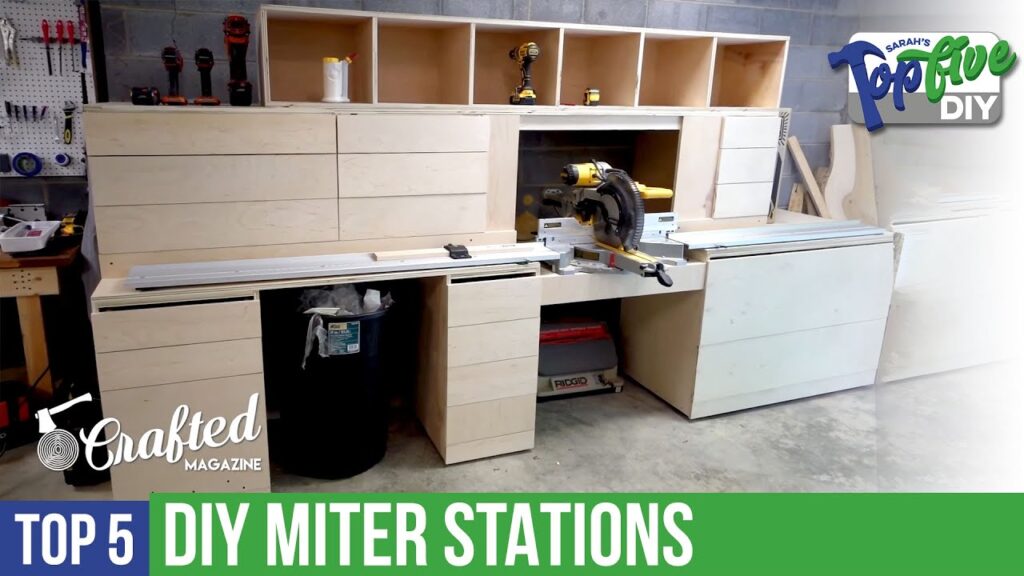
#2 is Crafted Workshop
If you are up for the challenge of building your own shop cabinets this one build is perfect! Johnny built a modified version of the Miter Station that Jay Bates built. He started by cutting down the 12 sheets of plywood that he needed for this build. Once he had all of his cuts done he started assembling the base cabinet carcass’. He added adjustable feet then moved on to the drawer assembly. All 18 of them. In part 2 of this build Johnny leveled the cabinets, mounted them to the wall, added the table top, dust collection, the Miter saw, the fence and the top cabinets! There is a lot here but worth every minute! Look at all of those drawers!
# 2 Part Two
Finally coming it at #1 is I Like To Make Stuff!
Bob made a super simple Miter station that is not only cost effective but also strong! Using pocket screws and 2x4s. These are pretty simple designs for making a worktable. Bob made two tables using butt joints and decking screws, and then made a little shelf that sits between them for the miter saw. Next he cut down plywood for the box to hold the miter saw with extra dust collection. He mounted the saw, added table tops, and added this sweet fence with t-tracks for later adding stop blocks. See, super simple but still really pretty and useful!
Alright, do me a favor and like this video and if you are not already subscribed to Belts and Boxes please do that now, and hit the bell so you don’t miss any of our shows that come out during the week! You can catch me every Friday at 5pm for the Power Tool Week In Review with Rob, and every Saturday at 6pm for the next episode of Maker Break! See you then!

