
Hey guys! My name’s Sarah, and this is my Top 5 DIY, Coffee Cup Displays! Twice a week I’ll help you sort through the endless stream of maker videos, and help you find the very best of the best for your next build!
#5 Scotty Turner
Let’s get started with #5! Scotty Turner started his build at the miter saw to cut the long and short pieces that will make up the the frame for his display. Then he headed to the table saw to rip down the boards to 5 inches wide. Once the frame was glued up and nailed together it was time to build and attach the shelves for the mugs. He used a stop block on his miter saw to make quick work of cutting all of the supports for the shelves. Using his circular saw he cut out the hardboard backing. The Final assembly was done with a nailer and after a few coats of stain it was ready for the coffee cups!
#4 Home Built Workshop
Home Built Workshop is #4! This was a commission piece and the client needed this thing to be a big project to fit all of their mugs. Jeff started by cutting all of his boards to length. He needed 7 boards for the front and 3 supporting boards for the back. He glued and nailed all of the boards together making sure he used his spacers and square to guarantee they all lined up perfectly. He added pegs for extra stability, but said this may have been a little overkill. But since it was for someone else’s home he would rather be extra safe, than sorry. Jeff then drilled all of the holes for the pegs that the mugs will hang from and got them glued into place. After a beautiful coat of stain this was ready to be delivered!
#3 Land to House
Next Up is #3. Land to House started off his coffee mug display with the frame! He cut all four pieces with a 45 degree angle on the ends so there is no end grain showing. Once he glued up the corners he predrilled holes and used a small nail and hammer to keep it together, but if you have a nailer that would be easier and a lot faster. Next he added the vertical dividers at 6” increments to give plenty of clearance for different sized mugs. Then he added the little shelves. All that was left was to add some paint, mount it on the wall and add all of the coffee cups. The only thing I would change here would be using less conspicuous hardware to mount it on the wall. But besides that, I love this!
#2 The DIY Cottage
# 2 is…The DIY Cottage. Breha started off her project like most projects by cutting her boards to the proper length. For her version of a coffee cup display She used scrap wood she had laying around, but you could easily use new lumber. Once she figured out how much space she needed for the cups to hang without bumping into each other she attached the back supports that will be mounted to the wall. Next She painted the top piece with chalk paint so she could add fun notes and messages and then got to add the hooks for all of the coffee cups! This is a cute and easy project that could really free up cabinet space!
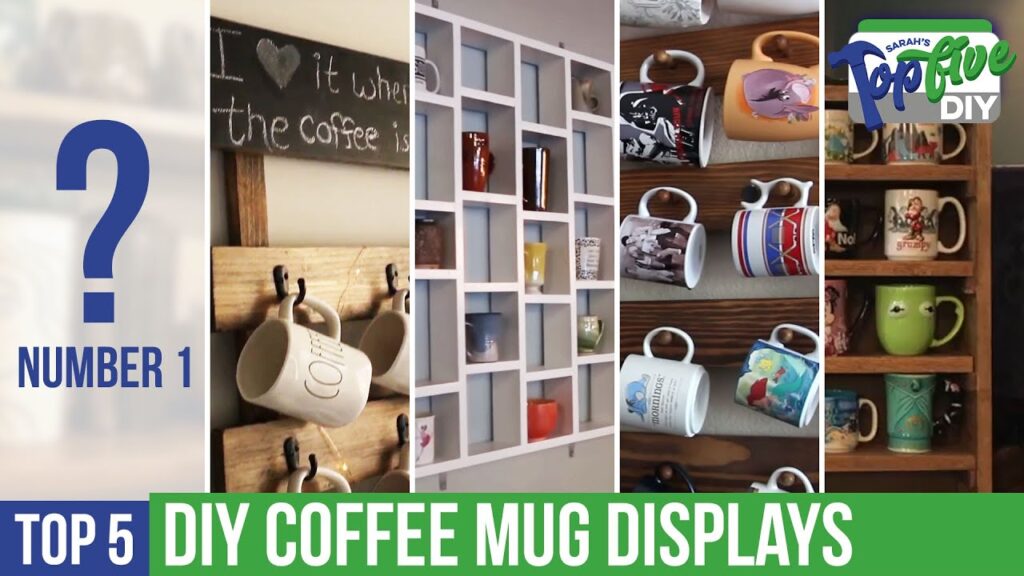
#1 Make Everything
Last but not least is Make Everything at #1! You know how it goes, you buy four more coffee cups even though you already have three, or ten and now you need more space to store them all. Completely normal! (I have more than I can count) Moving on! Make Everything went a completely different route with his coffee cup display and decided in order to properly store his new collection pieces he needed to weld himself a shelf! He made the top using angle iron so the wooden shelf could rest within the frame. Next he welded the base of the little shelf and attached it to the top. Then using a template he fabricated these swirls for a pretty design element for the back and sides.
Alright, do me a favor and like this video and if you are not already subscribed to Belts and Boxes please do that now, and hit the bell so you don’t miss any of our shows that come out during the week! You can catch me every Friday at 5pm for the Power Tool Week In Review with Rob, and every Saturday at Noon for the next episode of Maker Break! See you then!

